
Work light (WL01) support
Identify your part
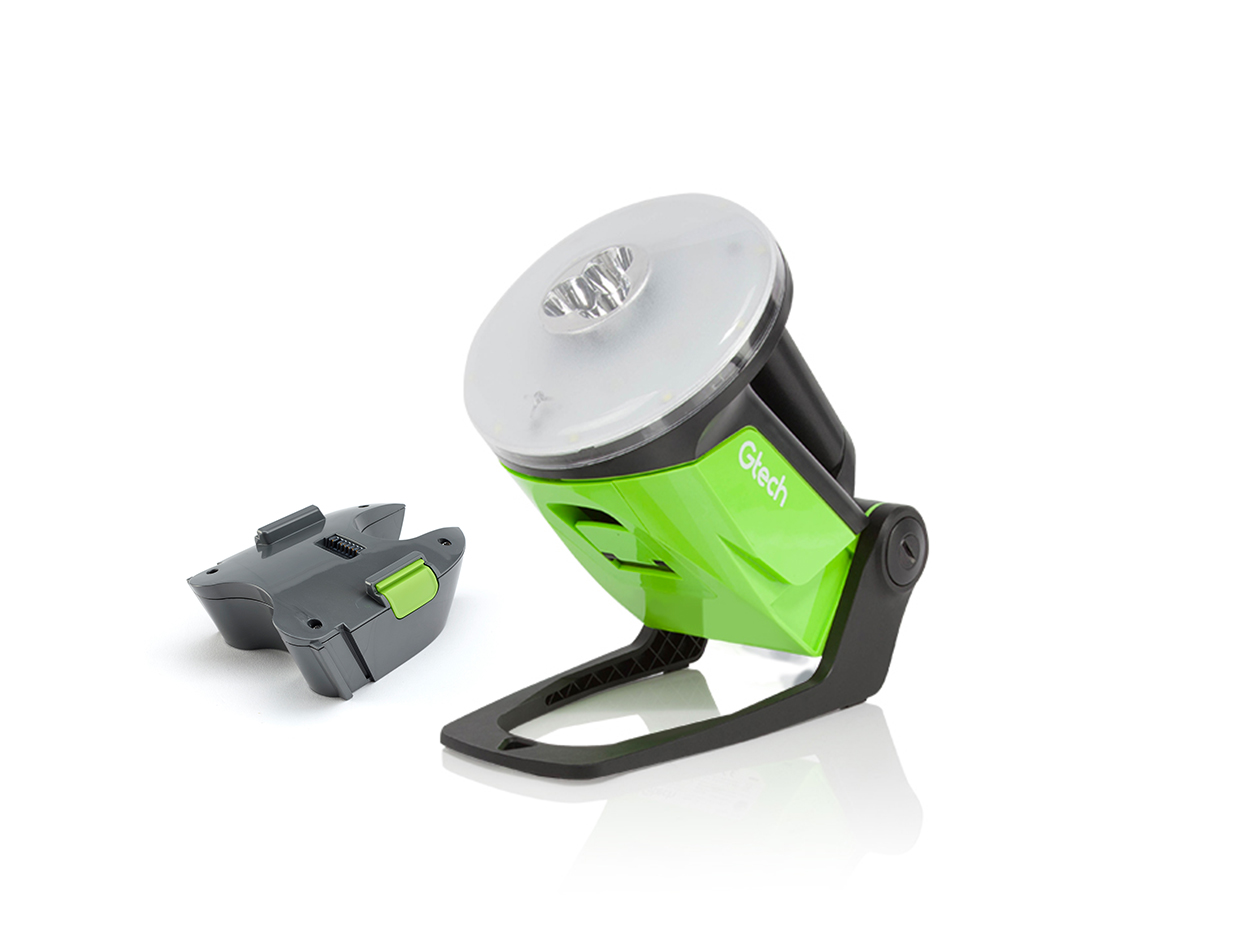
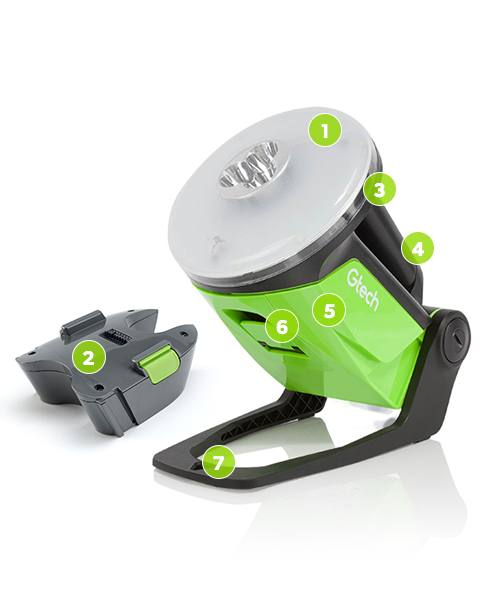
- 1 LEDs
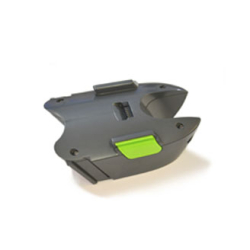
- 2 Battery
- 3 1. On/Off button 2. Mode selector
- 4 Handle
- 5 Main body
- 6 Battery cover release latch
- 7 Stand
Troubleshooting
Check that the battery is charged
We know it sounds silly, but it’s always worth double checking that your battery is actually charged!
Remove the battery from the Work Light body. Plug the charger into the charging port located on the back of the battery before plugging it into the mains. The battery will be fully charged after 4 hours.
Check that the battery is fitted correctly
Open the green battery cover. Remove the battery by pressing the two green buttons on the sides of the battery. Pull it away from the main body.
Reinsert the battery back into its housing, lining up the terminals and making sure the ratings label is towards the back of the light. When fitted correctly, the battery will click and secure into place.
The battery terminals may be dirty or damaged
Remove the battery.
If dirt or dust gets into contact with the battery terminals, they won’t connect properly. Remove the battery and use a dry, soft cloth to clean the terminals – the battery terminals are located on top of the battery, between the green clips. Also clean the terminals inside the battery-housing – these are inside the Work Light and look like metal prongs.
Reinsert the battery and try again.
Check the On/ Off switch
Check that On/ Off switch been moved to the ‘On’ position. When the On/ Off button is first pressed, the lights should illuminate in Mode 1.
Pressing the On/ Off button will illuminate a different mode each time, up to Mode 3. After this, pressing the On/ Off button will turn the Work Light off, and then begin the cycle again.
If the On/Off button is not working, you can also try using a different battery - the Multi MK2/ K9 battery is compatible with the Work Light.
If there are still no lights illuminating after pressing the On/ Off button several times, get in touch with us as we may need to send you a replacement part.
Is the battery charged?
We know it sounds silly, but it’s always worth double checking that your battery is actually charged!
Remove the battery from the Work Light body. Plug the charger into the charging port located on the back of the battery before plugging it into the mains. The battery will be fully charged after 4 hours.
Check that the battery is fitted correctly
Open the green battery cover. Remove the battery by pressing the two green buttons on the sides of the battery. Pull it away from the main body.
Reinsert the battery back into its housing, lining up the terminals and making sure the ratings label is towards the back of the light. When fitted correctly, the battery will click and secure into place.
The battery terminals may be dirty or damaged?
Remove the battery.
If dirt or dust gets into contact with the battery terminals, they won’t connect properly. Remove the battery and use a dry, soft cloth to clean the terminals – the battery terminals are located on top of the battery, between the green clips. Also clean the terminals inside the battery-housing – these are inside the Work Light and look like metal prongs.
Reinsert the battery and try again.
The run-time has been reduced - is the light constantly in Mode 2?
Run-time will be reduced depending on which mode is being used. Mode 2 will reduce run-time more quickly if used constantly.
Check the charger
If you’ve worked your way through the above steps and your Work Light is still not working, it may be an issue with your charger. There are a few ways you can check if there’s an issue with the charger.
When the battery is put on the charging stand, a green light should illuminate on the stand and pulsating green lights should show on the battery while it charges. If there are no lights illuminated, continue to the next step.
If the battery is fitting loosely in the charging stand, there will be excessive movement when the battery is plugged in and it may not charge correctly. Get in touch with us as we may need to send you a replacement part.
Check to see if the charger gets warm when it is charging the battery. Check for signs of damage to the charger cable. If it’s ripped or frayed, or if the terminals pins are broken on the charger, you need a replacement charger to ensure your trimmer works safely. You can buy a replacement charger online via our spares page.
Check for signs of damage to the hole in the battery that the charger goes into. If you can’t see anything wrong with your charger but it’s still not working, try plugging it into another socket as it may be an issue with the mains.
If you have a spare charger, try using that one instead – the HT20 is compatible with the chargers for the AirRam/ K9, Multi/ K9, Pro/ K9, Power Floor/ K9, ST20 and ST20.
If you’ve taken all the steps to check your battery and charger and your utility light still isn’t charging, get in touch with us as we may need to send you a replacement part.
Troubleshooting
No Power
Check that the battery is charged
We know it sounds silly, but it’s always worth double checking that your battery is actually charged!
Remove the battery from the Work Light body. Plug the charger into the charging port located on the back of the battery before plugging it into the mains. The battery will be fully charged after 4 hours.
Check that the battery is fitted correctly
Open the green battery cover. Remove the battery by pressing the two green buttons on the sides of the battery. Pull it away from the main body.
Reinsert the battery back into its housing, lining up the terminals and making sure the ratings label is towards the back of the light. When fitted correctly, the battery will click and secure into place.
The battery terminals may be dirty or damaged
Remove the battery.
If dirt or dust gets into contact with the battery terminals, they won’t connect properly. Remove the battery and use a dry, soft cloth to clean the terminals – the battery terminals are located on top of the battery, between the green clips. Also clean the terminals inside the battery-housing – these are inside the Work Light and look like metal prongs.
Reinsert the battery and try again.
Check the On/ Off switch
Check that On/ Off switch been moved to the ‘On’ position. When the On/ Off button is first pressed, the lights should illuminate in Mode 1.
Pressing the On/ Off button will illuminate a different mode each time, up to Mode 3. After this, pressing the On/ Off button will turn the Work Light off, and then begin the cycle again.
If the On/Off button is not working, you can also try using a different battery - the Multi MK2/ K9 battery is compatible with the Work Light.
If there are still no lights illuminating after pressing the On/ Off button several times, get in touch with us as we may need to send you a replacement part.
Battery & Charging
Is the battery charged?
We know it sounds silly, but it’s always worth double checking that your battery is actually charged!
Remove the battery from the Work Light body. Plug the charger into the charging port located on the back of the battery before plugging it into the mains. The battery will be fully charged after 4 hours.
Check that the battery is fitted correctly
Open the green battery cover. Remove the battery by pressing the two green buttons on the sides of the battery. Pull it away from the main body.
Reinsert the battery back into its housing, lining up the terminals and making sure the ratings label is towards the back of the light. When fitted correctly, the battery will click and secure into place.
The battery terminals may be dirty or damaged?
Remove the battery.
If dirt or dust gets into contact with the battery terminals, they won’t connect properly. Remove the battery and use a dry, soft cloth to clean the terminals – the battery terminals are located on top of the battery, between the green clips. Also clean the terminals inside the battery-housing – these are inside the Work Light and look like metal prongs.
Reinsert the battery and try again.
The run-time has been reduced - is the light constantly in Mode 2?
Run-time will be reduced depending on which mode is being used. Mode 2 will reduce run-time more quickly if used constantly.
Check the charger
If you’ve worked your way through the above steps and your Work Light is still not working, it may be an issue with your charger. There are a few ways you can check if there’s an issue with the charger.
When the battery is put on the charging stand, a green light should illuminate on the stand and pulsating green lights should show on the battery while it charges. If there are no lights illuminated, continue to the next step.
If the battery is fitting loosely in the charging stand, there will be excessive movement when the battery is plugged in and it may not charge correctly. Get in touch with us as we may need to send you a replacement part.
Check to see if the charger gets warm when it is charging the battery. Check for signs of damage to the charger cable. If it’s ripped or frayed, or if the terminals pins are broken on the charger, you need a replacement charger to ensure your trimmer works safely. You can buy a replacement charger online via our spares page.
Check for signs of damage to the hole in the battery that the charger goes into. If you can’t see anything wrong with your charger but it’s still not working, try plugging it into another socket as it may be an issue with the mains.
If you have a spare charger, try using that one instead – the HT20 is compatible with the chargers for the AirRam/ K9, Multi/ K9, Pro/ K9, Power Floor/ K9, ST20 and ST20.
If you’ve taken all the steps to check your battery and charger and your utility light still isn’t charging, get in touch with us as we may need to send you a replacement part.
Register your product
RegisterRegister to access your Gtech warranty, and for quicker and more efficient support tailored for you.
RegisterSpares
-
 Multi MK2 Battery£69.99
 -
 Floorcare Charger£19.99
Still need a hand?
We're ready when you are