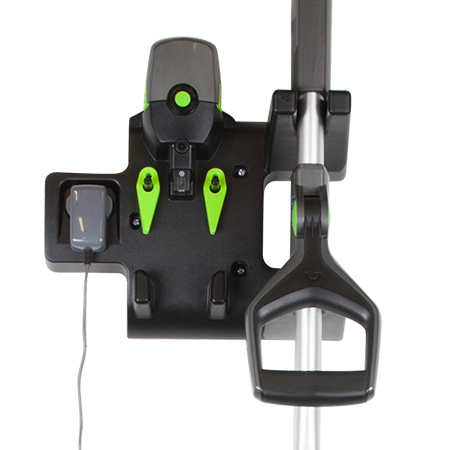
Hedge Trimmer (HT3.0) support
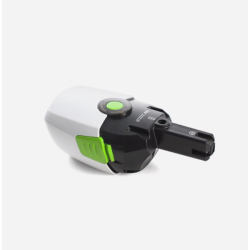
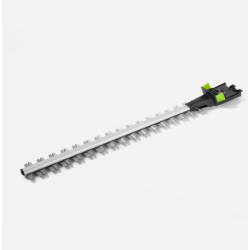
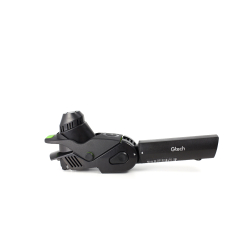
Identify your part
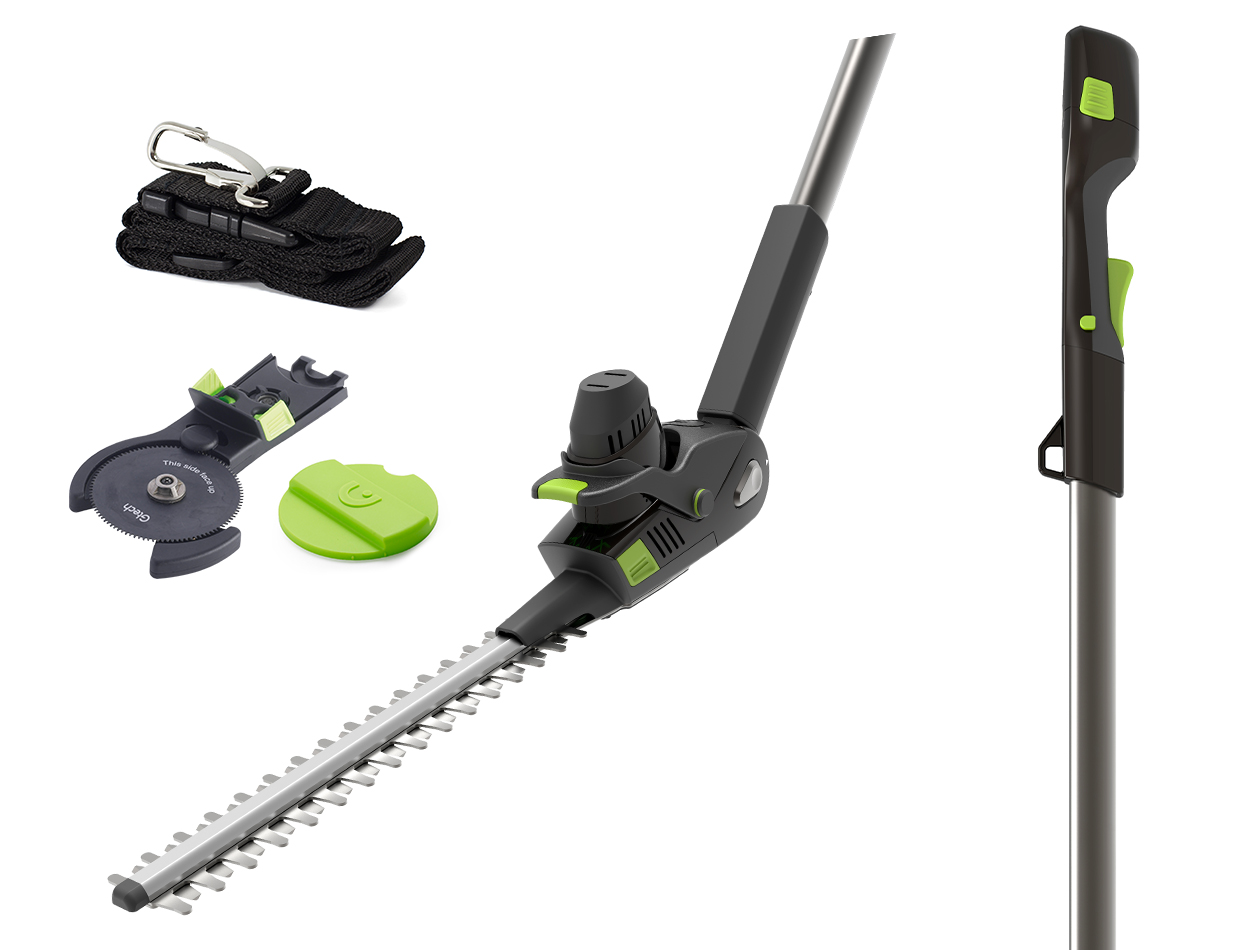
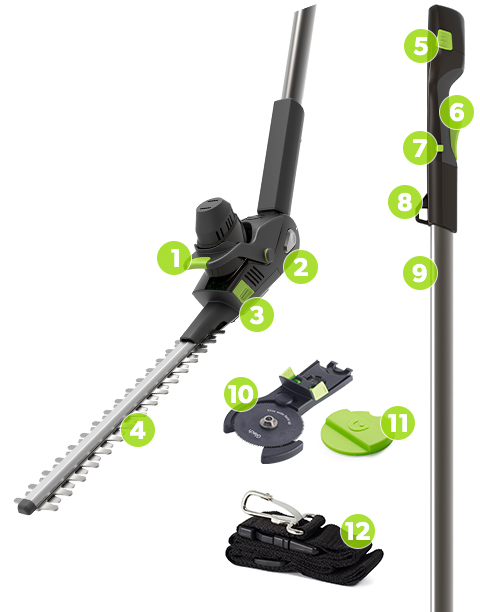
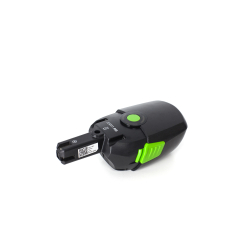
- 1 Head adjustment button
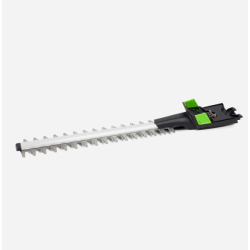
- 2 Trimmer head
- 3 Attachment removal button
- 4 Blade
- 5 Removable battery with state-of-charge indicator
- 6 Trigger
- 7 Safety button
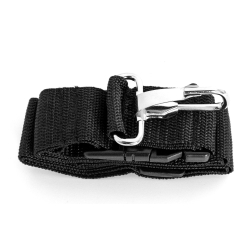
- 8 Harness attachment
- 9 Pole
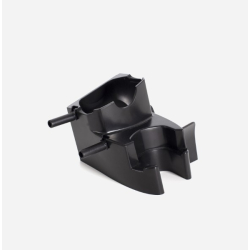
- 10 Branch cutter attachment
- 11 Branch cutter attachment cover
- 12 Safety harness
Troubleshooting
Check that the battery is charged
We know it sounds silly, but it’s always worth double checking that your battery is actually charged!
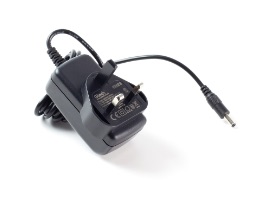
To charge the battery, remove it from the handle of the HT3.0 by squeezing the green buttons on the sides of the battery. Pull it away from the trimmer. Press the green button in the middle of the battery to show the state-of-charge display – if 1 green light is shown, you will need to charge your battery.
Plug the charger into the charging port on the end of the battery. 1 green light will appear on the state-of-charge display while it charges. 4 solid green lights will illuminate when the battery is fully charged after 4 hours.
Check that the battery is fitted correctly
Remove the battery from the handle by squeezing the green buttons on the sides of the battery. Pull it away from the trimmer. Check the battery, terminals and housing for signs of damage.
Reinsert the battery into the end of the handle, ensuring the terminals line up. Push the battery inwards until you hear it click into place.
Are you pressing the safety button?
Press and hold the safety button on one side of the handle and then press the start trigger. Only one side of the safety button can be pressed at once, so don’t try to squeeze them both at the same time! You can release the safety button once the trimmer has started, just continue to press the start trigger.
The safety button should stay pressed in while you are pressing the trigger. If it pops out, the machine will cut out.
Is the trigger pressed?
The trigger must be continuously pressed down. The machine will stop when the trigger is released.
Is the blade jammed?
Remove the battery before carrying out any maintenance work.
If the blade is jammed, the machine will cut out. Remove the battery and remove the blade/ branch cutter attachment from the trimmer. Remove any obstruction(s) from the blade. If there are no signs of damage, reattach the blade/ branch-cutter attachment by line the up the blade attachments into the trimmer head and push it on to the head. You will hear it click into place when fitted correctly.
If the blade or branch-cutter blade is damaged or worn, you can order replacements online via our spares page.
Check that the head is correctly fitted
Remove the battery before carrying out any maintenance work.
The trimmer will not work if the trimmer head is not correctly fitted onto the main body. Remove the head by pressing in the black head-release button, which can be found on the handle. Pull the head away from the handle. Refit the head, making sure both parts are the correct way up and the black button on the body clicks the head securely into place.
The battery terminals or head terminals may be dirty or damaged
Remove the battery before carrying out any maintenance work.
If dirt or dust gets into contact with the battery or head terminals, they won’t connect properly. Remove the battery from the handle and use a dry, soft cloth to clean the terminals on the battery and battery-housing. Insert the battery and try again. Remove the head by pressing in the black head-release button, which can be found on the handle. Pull the head away from the handle.
Use a dry, soft cloth to clean the terminals inside the head of the trimmer - these look like 2 silver pins. Reattach the head and try again.
The type of hedge/ branches you’re cutting will affect run-time
Run-time will be reduced depending upon the thickness/ length of hedge, foliage or branch being cut. If you are cutting something thick, try doing it in stages rather than all at once if you’re struggling. Do not attempt to use this trimmer on wet hedges.
Check if the blade is worn or damaged
Remove the battery before carrying out any maintenance work.
Remove the battery from the trimmer and remove the obstruction(s) from the blade. If there are no signs of damage, line the blade up with the head and push it on to the head. You will hear it click into place when fitted correctly.
If the blade is damaged or worn, you can order a replacement online via our spares page.
Check that the battery is charged
We know it sounds silly, but it’s always worth double checking that your battery is actually charged!
To charge the battery, remove it from the handle of the HT20 by squeezing the green buttons on the sides of the battery. Pull it away from the trimmer. Press the green button in the middle of the battery to show the state-of-charge display – if 1 green light is shown, you will need to charge your battery.
Plug the charger into the charging port on the end of the battery. 1 green light will appear on the state-of-charge display while it charges. 4 solid green lights will illuminate when the battery is fully charged after 4 hours.
Check that the battery is fitted correctly
Remove the battery from the handle by squeezing the green buttons on the sides of the batter. Pull it away from the trimmer. Check the battery, terminals and housing for signs of damage.
Reinsert the battery into the end of the handle, ensuring the terminals line up. Push the battery inwards until you hear it click into place.
The battery terminals may be dirty or damaged
Remove the battery before carrying out any maintenance work.
If dirt or dust gets into contact with the battery or head terminals, they won’t connect properly. Remove the battery from the handle and use a dry, soft cloth to clean the terminals on the battery and battery-housing. Insert the battery and try again. Remove the head by pressing in the black head-release button, which can be found on the handle. Pull the head away from the handle.
Use a dry, soft cloth to clean the terminals inside the head of the trimmer - these look like 2 silver pins. Reattach the head and try again.
Check the battery lights
•1 solid green light flashes for 10 seconds
Charge the battery for 4 hours until all 4 lights on the state-of-charge display turn solid green.
•4 solid red lights while the trimmer is in use
The blade or branch-cutter has jammed.Remove the battery and remove the blade/ branch cutter attachment from the trimmer. Remove any obstruction(s) from the blade. If there are no signs of damage, reattach the blade/ branch-cutter attachment by line the up the blade attachments into the trimmer head and push it on to the head. You will hear it click into place when fitted correctly. If the blade or branch-cutter blade is damaged or worn, you can order replacements online via our spares page.
•4 solid red lights when the battery is detached from the trimmer
This suggests that the battery has been stored in extremely hot/ cold temperatures. Keep the battery somewhere at room temperature for 24 hours and then fully charge the battery for 4 hours.
•4 solid red lights when the extension tube has been attached
Remove the extension tube from the trimmer and reattach the head. Try using the hedge trimmer again without the extension tube. If the trimmer now works, reattach the extension tube, making sure it is fitted correctly. Try using the hedge trimmer again.
•4 flashing red lights
The battery has overheated. Remove the battery from the trimmer (and from the charger) and allow the battery to cool for 10 minutes. Refit the battery and try using the trimmer again.
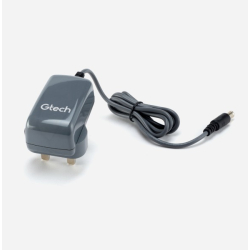
Check the charger
If you’ve worked your way through the above steps and your HT3.0 is still not working, it may be an issue with your charger. There are a few ways you can check if there’s an issue with the charger.
When the battery is put on the charging stand, a green light should illuminate on the stand and pulsating green lights should show on the battery while it charges. If there are no lights illuminated, continue to the next step.
If the battery is fitting loosely in the charging stand, there will be excessive movement when the battery is plugged in and it may not charge correctly. Get in touch with us as we may need to send you a replacement part.
Check to see if the charger gets warm when it is charging the battery. Check for signs of damage to the charger cable. If it’s ripped or frayed, or if the terminals pins are broken on the charger, you need a replacement charger to ensure your trimmer works safely. You can buy a replacement charger online via our spares page.
Check for signs of damage to the hole in the battery that the charger goes into. If you can’t see anything wrong with your charger but it’s still not working, try plugging it into another socket as it may be an issue with the mains.
If you have a spare charger, try using that one instead – the HT3.0 is compatible with the chargers for the GT3.0 and GT4.0 as well.
If you’ve taken all the steps to check your battery and charger and your trimmer still isn’t charging, get in touch with us as we may need to send you a replacement part.
Is the blade/ branch-cutter fitted correctly?
Remove the battery before carrying out any maintenance work.
Remove the blade/ branch-cutter attachment from the head by pressing in the two green buttons on the sides of the attachment and pulling it away from the trimmer head. Check for any signs of damage.
If there are no signs of damage, line the blade/ branch-cutter up with the head and push it on to the head. You will hear it click into place when fitted correctly. If the blade or branch-cutter are damaged or worn, you can order replacements online via our spares page.
The blade/ branch-cutter is not cutting
Remove the battery before carrying out any maintenance work.
Remove any obstruction(s) from around blade/ branch-cutter and retry the trimmer. Tighten the blade nuts that run down the blade or the middle nut on the branch-cutter before every use. Check the blade for signs of damage.
If the blade or branch-cutter are damaged or worn, you can order replacements online via our spares page.
The blade/ branch-cutter is not moving
Remove the battery before carrying out any maintenance work.
Remove the blade from the trimmer head and check for damage to the black cog on the back of the trimmer blade attachment. If there’s no damage, check that the cog will turn clockwise by hand. If it does, check the silver cog on the trimmer head. Reattach the battery and switch the machine on to see if the silver cog is turning.
Do not touch the cog while the machine is operating. If either of the cogs are not moving, get in touch with us as we may need to send you a replacement part.
The trimmer head cog is damaged
Check the cog on the trimmer head for signs of damage.
It should be securely attached to the trimmer head. Turn the cog in a clockwise direction – you may need to use a small amount of force to do so. The cog should then start to turn with no resistance.
If the cog is damaged or not functioning properly, you can order a replacement trimmer head online via our spares page.
Trouble removing the branch-cutter from the trimmer head
Remove the battery before carrying out any maintenance work.
Ensure the green buttons on the sides of the branch-cutter have been pressed in. Firmly press the two buttons together and pull the branch-cutter away from the trimmer head to remove.
The branch-cutter is not cutting
Remove the battery before carrying out any maintenance work.
Remove any obstruction(s) from around the branch-cutter and try using it again. Check the branch-cutter for damage and order a replacement online via our spares page. The blades are built to last, but will wear over time with consistent use.
The branch-cutter blade is not spinning
Remove the battery before carrying out any maintenance work.
Remove the branch-cutter from the trimmer head and check for signs of damage to the cog. If there signs of damage, get in touch with us as we may need to send you a replacement part.
Trouble fitting the trimmer head
The black button located at the bottom of the main body should easily spring in and out when pressed. Line up the button with the small hole in the neck of the trimmer head.
When correctly fitted, the black button should pop through the hole in the trimmer head, locking the head and main body into place.
Trouble removing the trimmer head
The trimmer head may be fitted incorrectly to the main body. Firmly pull the main body and trimmer head apart to separate them and refit as above.
The black button located at the bottom of the main body should be pressed in. If it’s not, push it in and pull the main body and trimmer head apart to separate them.
Trouble adjusting the angle of the trimmer head
Firmly press the angle adjustment button (the green button located on the top of the trimmer head). Hold the button down and adjust the trimmer head to select the angle required. Release the button when the preferred angle has been selected. The trimmer head will click and lock into place.
If the angle adjustment button will not press in, you can order a replacement trimmer head online via our spares page.
Troubleshooting
No Power
Check that the battery is charged
We know it sounds silly, but it’s always worth double checking that your battery is actually charged!
To charge the battery, remove it from the handle of the HT3.0 by squeezing the green buttons on the sides of the battery. Pull it away from the trimmer. Press the green button in the middle of the battery to show the state-of-charge display – if 1 green light is shown, you will need to charge your battery.
Plug the charger into the charging port on the end of the battery. 1 green light will appear on the state-of-charge display while it charges. 4 solid green lights will illuminate when the battery is fully charged after 4 hours.
Check that the battery is fitted correctly
Remove the battery from the handle by squeezing the green buttons on the sides of the battery. Pull it away from the trimmer. Check the battery, terminals and housing for signs of damage.
Reinsert the battery into the end of the handle, ensuring the terminals line up. Push the battery inwards until you hear it click into place.
Are you pressing the safety button?
Press and hold the safety button on one side of the handle and then press the start trigger. Only one side of the safety button can be pressed at once, so don’t try to squeeze them both at the same time! You can release the safety button once the trimmer has started, just continue to press the start trigger.
The safety button should stay pressed in while you are pressing the trigger. If it pops out, the machine will cut out.
Is the trigger pressed?
The trigger must be continuously pressed down. The machine will stop when the trigger is released.
Is the blade jammed?
Remove the battery before carrying out any maintenance work.
If the blade is jammed, the machine will cut out. Remove the battery and remove the blade/ branch cutter attachment from the trimmer. Remove any obstruction(s) from the blade. If there are no signs of damage, reattach the blade/ branch-cutter attachment by line the up the blade attachments into the trimmer head and push it on to the head. You will hear it click into place when fitted correctly.
If the blade or branch-cutter blade is damaged or worn, you can order replacements online via our spares page.
Check that the head is correctly fitted
Remove the battery before carrying out any maintenance work.
The trimmer will not work if the trimmer head is not correctly fitted onto the main body. Remove the head by pressing in the black head-release button, which can be found on the handle. Pull the head away from the handle. Refit the head, making sure both parts are the correct way up and the black button on the body clicks the head securely into place.
The battery terminals or head terminals may be dirty or damaged
Remove the battery before carrying out any maintenance work.
If dirt or dust gets into contact with the battery or head terminals, they won’t connect properly. Remove the battery from the handle and use a dry, soft cloth to clean the terminals on the battery and battery-housing. Insert the battery and try again. Remove the head by pressing in the black head-release button, which can be found on the handle. Pull the head away from the handle.
Use a dry, soft cloth to clean the terminals inside the head of the trimmer - these look like 2 silver pins. Reattach the head and try again.
The type of hedge/ branches you’re cutting will affect run-time
Run-time will be reduced depending upon the thickness/ length of hedge, foliage or branch being cut. If you are cutting something thick, try doing it in stages rather than all at once if you’re struggling. Do not attempt to use this trimmer on wet hedges.
Check if the blade is worn or damaged
Remove the battery before carrying out any maintenance work.
Remove the battery from the trimmer and remove the obstruction(s) from the blade. If there are no signs of damage, line the blade up with the head and push it on to the head. You will hear it click into place when fitted correctly.
If the blade is damaged or worn, you can order a replacement online via our spares page.
Battery & Charging
Check that the battery is charged
We know it sounds silly, but it’s always worth double checking that your battery is actually charged!
To charge the battery, remove it from the handle of the HT20 by squeezing the green buttons on the sides of the battery. Pull it away from the trimmer. Press the green button in the middle of the battery to show the state-of-charge display – if 1 green light is shown, you will need to charge your battery.
Plug the charger into the charging port on the end of the battery. 1 green light will appear on the state-of-charge display while it charges. 4 solid green lights will illuminate when the battery is fully charged after 4 hours.
Check that the battery is fitted correctly
Remove the battery from the handle by squeezing the green buttons on the sides of the batter. Pull it away from the trimmer. Check the battery, terminals and housing for signs of damage.
Reinsert the battery into the end of the handle, ensuring the terminals line up. Push the battery inwards until you hear it click into place.
The battery terminals may be dirty or damaged
Remove the battery before carrying out any maintenance work.
If dirt or dust gets into contact with the battery or head terminals, they won’t connect properly. Remove the battery from the handle and use a dry, soft cloth to clean the terminals on the battery and battery-housing. Insert the battery and try again. Remove the head by pressing in the black head-release button, which can be found on the handle. Pull the head away from the handle.
Use a dry, soft cloth to clean the terminals inside the head of the trimmer - these look like 2 silver pins. Reattach the head and try again.
Check the battery lights
•1 solid green light flashes for 10 seconds
Charge the battery for 4 hours until all 4 lights on the state-of-charge display turn solid green.
•4 solid red lights while the trimmer is in use
The blade or branch-cutter has jammed.Remove the battery and remove the blade/ branch cutter attachment from the trimmer. Remove any obstruction(s) from the blade. If there are no signs of damage, reattach the blade/ branch-cutter attachment by line the up the blade attachments into the trimmer head and push it on to the head. You will hear it click into place when fitted correctly. If the blade or branch-cutter blade is damaged or worn, you can order replacements online via our spares page.
•4 solid red lights when the battery is detached from the trimmer
This suggests that the battery has been stored in extremely hot/ cold temperatures. Keep the battery somewhere at room temperature for 24 hours and then fully charge the battery for 4 hours.
•4 solid red lights when the extension tube has been attached
Remove the extension tube from the trimmer and reattach the head. Try using the hedge trimmer again without the extension tube. If the trimmer now works, reattach the extension tube, making sure it is fitted correctly. Try using the hedge trimmer again.
•4 flashing red lights
The battery has overheated. Remove the battery from the trimmer (and from the charger) and allow the battery to cool for 10 minutes. Refit the battery and try using the trimmer again.
Check the charger
If you’ve worked your way through the above steps and your HT3.0 is still not working, it may be an issue with your charger. There are a few ways you can check if there’s an issue with the charger.
When the battery is put on the charging stand, a green light should illuminate on the stand and pulsating green lights should show on the battery while it charges. If there are no lights illuminated, continue to the next step.
If the battery is fitting loosely in the charging stand, there will be excessive movement when the battery is plugged in and it may not charge correctly. Get in touch with us as we may need to send you a replacement part.
Check to see if the charger gets warm when it is charging the battery. Check for signs of damage to the charger cable. If it’s ripped or frayed, or if the terminals pins are broken on the charger, you need a replacement charger to ensure your trimmer works safely. You can buy a replacement charger online via our spares page.
Check for signs of damage to the hole in the battery that the charger goes into. If you can’t see anything wrong with your charger but it’s still not working, try plugging it into another socket as it may be an issue with the mains.
If you have a spare charger, try using that one instead – the HT3.0 is compatible with the chargers for the GT3.0 and GT4.0 as well.
If you’ve taken all the steps to check your battery and charger and your trimmer still isn’t charging, get in touch with us as we may need to send you a replacement part.
Blade & Cog Issues
Is the blade/ branch-cutter fitted correctly?
Remove the battery before carrying out any maintenance work.
Remove the blade/ branch-cutter attachment from the head by pressing in the two green buttons on the sides of the attachment and pulling it away from the trimmer head. Check for any signs of damage.
If there are no signs of damage, line the blade/ branch-cutter up with the head and push it on to the head. You will hear it click into place when fitted correctly. If the blade or branch-cutter are damaged or worn, you can order replacements online via our spares page.
The blade/ branch-cutter is not cutting
Remove the battery before carrying out any maintenance work.
Remove any obstruction(s) from around blade/ branch-cutter and retry the trimmer. Tighten the blade nuts that run down the blade or the middle nut on the branch-cutter before every use. Check the blade for signs of damage.
If the blade or branch-cutter are damaged or worn, you can order replacements online via our spares page.
The blade/ branch-cutter is not moving
Remove the battery before carrying out any maintenance work.
Remove the blade from the trimmer head and check for damage to the black cog on the back of the trimmer blade attachment. If there’s no damage, check that the cog will turn clockwise by hand. If it does, check the silver cog on the trimmer head. Reattach the battery and switch the machine on to see if the silver cog is turning.
Do not touch the cog while the machine is operating. If either of the cogs are not moving, get in touch with us as we may need to send you a replacement part.
The trimmer head cog is damaged
Check the cog on the trimmer head for signs of damage.
It should be securely attached to the trimmer head. Turn the cog in a clockwise direction – you may need to use a small amount of force to do so. The cog should then start to turn with no resistance.
If the cog is damaged or not functioning properly, you can order a replacement trimmer head online via our spares page.
Branch Cutter Attachment
Trouble removing the branch-cutter from the trimmer head
Remove the battery before carrying out any maintenance work.
Ensure the green buttons on the sides of the branch-cutter have been pressed in. Firmly press the two buttons together and pull the branch-cutter away from the trimmer head to remove.
The branch-cutter is not cutting
Remove the battery before carrying out any maintenance work.
Remove any obstruction(s) from around the branch-cutter and try using it again. Check the branch-cutter for damage and order a replacement online via our spares page. The blades are built to last, but will wear over time with consistent use.
The branch-cutter blade is not spinning
Remove the battery before carrying out any maintenance work.
Remove the branch-cutter from the trimmer head and check for signs of damage to the cog. If there signs of damage, get in touch with us as we may need to send you a replacement part.
Trimmer Head
Trouble fitting the trimmer head
The black button located at the bottom of the main body should easily spring in and out when pressed. Line up the button with the small hole in the neck of the trimmer head.
When correctly fitted, the black button should pop through the hole in the trimmer head, locking the head and main body into place.
Trouble removing the trimmer head
The trimmer head may be fitted incorrectly to the main body. Firmly pull the main body and trimmer head apart to separate them and refit as above.
The black button located at the bottom of the main body should be pressed in. If it’s not, push it in and pull the main body and trimmer head apart to separate them.
Trouble adjusting the angle of the trimmer head
Firmly press the angle adjustment button (the green button located on the top of the trimmer head). Hold the button down and adjust the trimmer head to select the angle required. Release the button when the preferred angle has been selected. The trimmer head will click and lock into place.
If the angle adjustment button will not press in, you can order a replacement trimmer head online via our spares page.
Register your product
RegisterRegister to access your Gtech warranty, and for quicker and more efficient support tailored for you.
RegisterSupport videos

Spares
-
 Garden Charger£19.99
 -
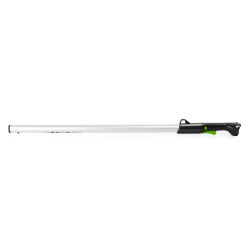 Hedge Trimmer HT3.0 Pole£28.99
 -
 Branch Cutter Attachment£24.99
 -
 Garden Rack (Style 1)£19.99
 -
 Garden Safety Kit (Large)£14.99
 -
 HT50 & GT50 Trimmer Battery£54.99
 -
 HT50 Long Blade£49.99


Still need a hand?
We're ready when you are